

How To Reduce Image File Size In Photoshop
How to Batch Resize Images in Photoshop
by Alec Druggan on Apr 18, 2022
Resizing your images for unlike utilise cases tin exist irksome, particularly if you demand to resize more than than one photo. If you lot're submitting photos, or using them for a website, y'all'll need to be able to quickly change the pixel dimensions of those images. Luckily, a photograph editing program similar Adobe Photoshop can help you lot batch resize images for fast and accurate results.
In this article, we'll show you lot how to batch resize images using Adobe Photoshop. Of class, y'all'll need to have installed Photoshop to follow along with this tutorial. If you don't have it still, yous can go Photoshop from Adobe's site here.
Choosing a Batch Resizing Method
Photoshop offers two methods for batch resizing images. In Photoshop, y'all tin can choose to batch resize your images by using:
- Photoshop'southward congenital-in Image Processor
- Your own batch resizing action that you create
While it's simpler to use Photoshop's Prototype Processor for batch resizing, information technology doesn't always work besides, especially if you need to batch resize images saved every bit different types of files, or as photos with differing dimensions.
Instead, we recommend creating your ain batch resizing Photoshop Action, which gives yous total control over the batch resizing process. This method is more reliable in the long run, fifty-fifty though it takes more up-front attempt to set.
While it might seem daunting, creating a batch resizing activeness is actually elementary, and it will save you time and try one time you've created it.
How to Batch Resizing Your Images
Whether you decide to utilize Photoshop's Image Processor or create you lot ain Photoshop Action, you'll first need to cull your images into a binder for resizing. Remember to store this binder somewhere hands accessible with a path you tin can remember. Then, make sure that all the images accept file types that work with Photoshop!
Here's the folder of images that we'll resize:

Notice that each of the 4 different images all have sizable differences in file size. A choice of epitome files similar this would bear witness troublesome for Photoshop'south congenital-in Image Processor. That'due south why we're going to create our own custom resizing function.
Just first, let's attempt to resize these images with the Photoshop Epitome Processor.
Using Photoshop Image Processor to Batch Resize Images
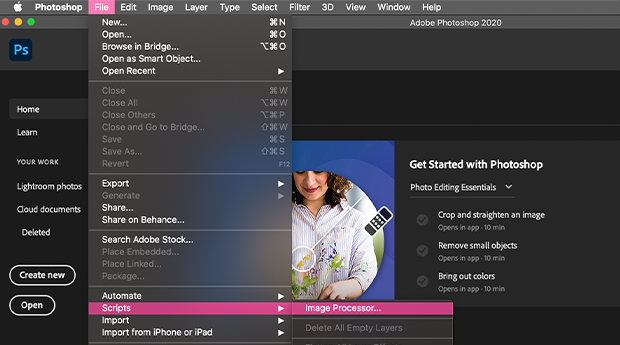
Once y'all've opened Photoshop, make your mode to File >> Scripts >> Image Processor in the awarding toolbar:
Selecting this selection opens the following Image Processor menu:
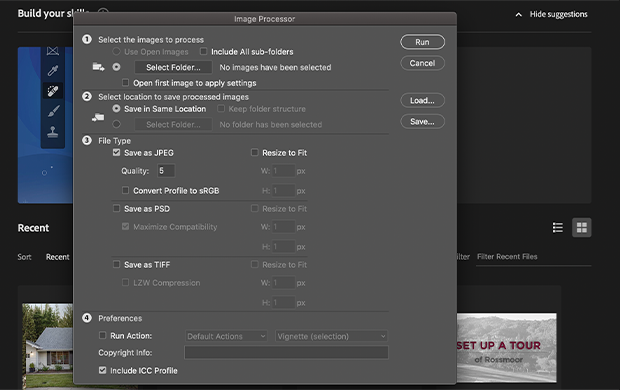
Now it's time to choose the folder containing the images yous desire to resize. Select your folder by pressing the select folder push button under one) Select the images to process.
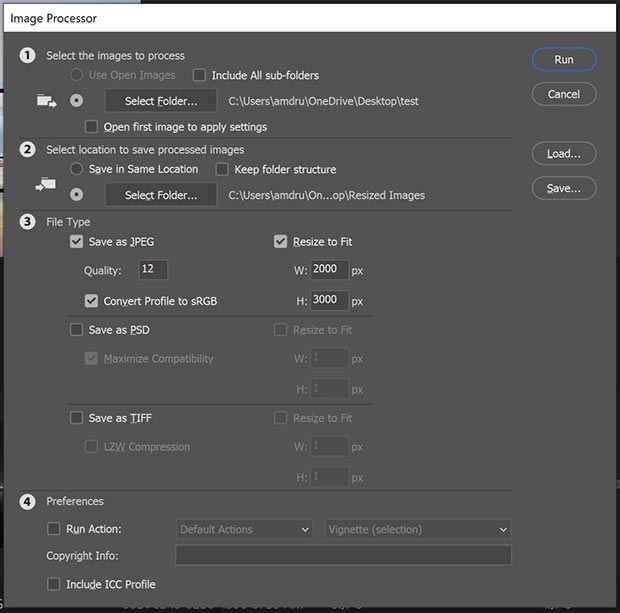
Your menu should look like this right earlier you run the process:
Let's talk almost the other settings available in the Image Processor dialog box. In one case you've selected your file folder, you take the choice to include all sub-folders for the information structure. If your image folder contains sub-folders with additional images that need resizing, check that box.
Open up the first image to apply the settings. This is great for other processes only less useful for our prototype resizing.
In the second option ii) Select Location to save processed images, make sure to create a 2nd folder to save your resized images. This will save you renaming headaches, along with differentiation problems.
The 3) File Blazon option allows you can change the image sizes. Because all the images in our folder to resize are ii×3 and vertical, we've chosen a resolution of 2,000 by 3,000 pixels. You lot can change these values depending on your preference.
Additionally, choose the file type that will piece of work all-time with your original files and your intended utilise for the resized images. You'll likely observe that JPEGs work best.
And then, click to run the process on your images. When Photoshop is finished, you can find your resized photos in your new binder:
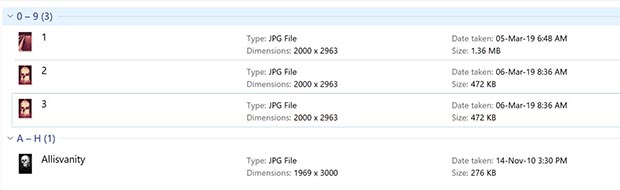
Equally you can see, after running the Prototype Processor, the sizes of the resized images are generally closer. But, yous'll likewise find that non all the dimensions are exactly the same for each photo.
This is mutual in Image processing scripts, equally none of the original images were perfectly ii×3. Instead, the Image Processor attempted to retain the 2×3 nature to minimize paradigm distortion.
Now, let'due south movement on to a better way of batch resizing images!
Batch Resizing Images in Photoshop Using Custom Actions
If you've never created an activeness in Photoshop before, you're in for a treat. Deportment let you lot to save processes that you often employ on your images during post-processing. Simply record the steps you typically take, and so save them to apply to future images.
Certainly, deportment are helpful when working on unmarried images. For example, I oftentimes use frequency separation to work on portraits. Having an action to automatically do all the grunt piece of work associated with frequency separation makes the process a lot easier, and a lot more than fun.
Even so, actions are at their best when used with Photoshop's batch processing function. Earlier we swoop into the batch processing, permit's learn how to create a Photoshop action.
Creating an Action in Photoshop
To offset, open up a new document in Photoshop. It really doesn't matter what this document is, you simply need to have access to the Photoshop workspace. And then, get to Window >> Actions or press Alt / Choice + F9 to open your actions pane.
Your action pane will wait something like this:
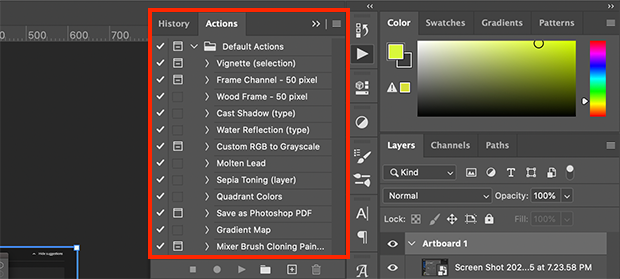
Play around with Photoshop's default deportment to get the experience of using them. Only choose one, then printing the play button. Some actions accept parameters, others just run.
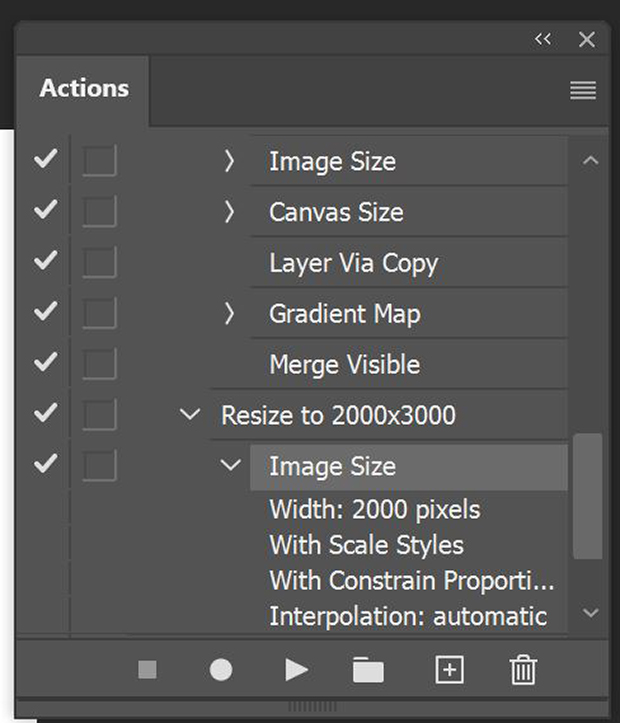
To create a new activeness, press the + button on the bottom card. This will prompt a popular upwardly menu to proper noun your action. We've named our activity Resize plus the resized dimensions 2,000×3,000:
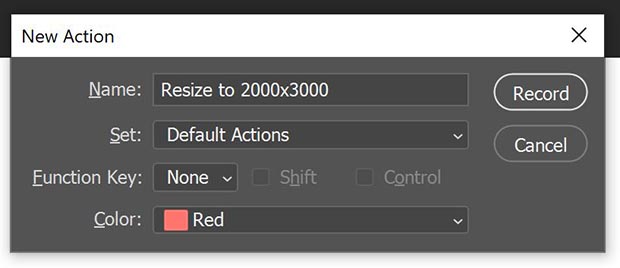
Yous can too assign your action a color characterization from this dialog box. Choosing colour labels for your actions based on when you typically apply them during the editing procedure tin help keep y'all organized. For example, an ordering system where cool colors marking front end-line editing and warm colors denote end-stage editing creates a filing organization that helps you find the right action quickly.
Next, press tape. The record push on your deportment panel will plough cherry-red when it's agile, like this:
As you create an action and add together steps to it, you'll see that Photoshop records each new step into the activeness.
Once you're recording, you can cull the steps that you wish to take. To resize the image, get to Image >> Epitome Size or press Alt / Choice + Control/Command + I.
Additionally, take notice of the Paradigm >> Canvas Size choice. This pick will change the size of the canvas, simply not the image. This means that you volition add background but not actually resize your image.
An activeness with Sail Size additions tin can help you create prints with equal borders on all sides. If you are planning on matting prints, you may want to use this to make sure the image is not being cut off by the mat when printed.
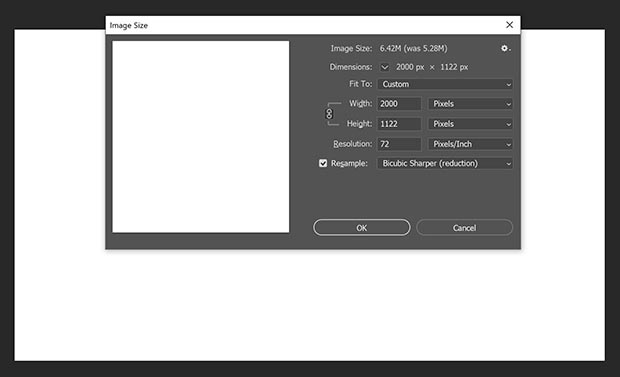
Here's what the right Image Size menu looks similar:
You tin piece of work in either pixels or inches, and reset your DPI to whatsoever you choose. For batch resizing, it is best to set Resampling information technology to Automated. Use the drop down menu, or press Alt/Pick + F1.
You want to make sure the link betwixt Width and Height is unbroken, equally seen in the image higher up. That means that when resized, the image will not be cut off or take random background added.
Additionally, cull either the width or the acme as your guiding measurement. We chose a width of 2000 pixels. This means that when we utilize this action, Photoshop volition adjust the image width to 2000 pixels and change the height accordingly without altering the photo'due south aspect ratio.
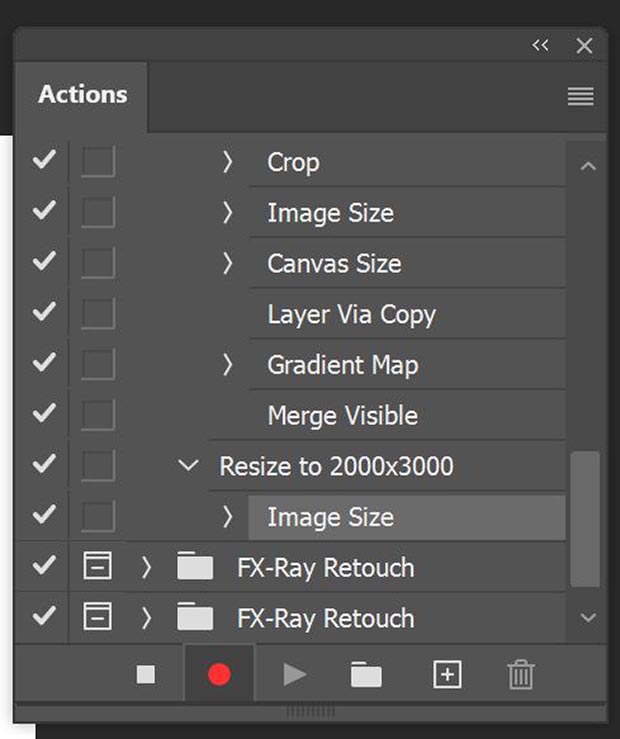
When you lot're washed with these settings, press OK or Enter/Return. At this point, your action console will take updated.
At present, printing the terminate sign icon next to the red recording sign to stop recording the activity. You tin press the dropdown pointer adjacent to "Paradigm Size" in the action panel to review what you programmed:
Now you're ready to utilize this action to batch resize images!
Applying Actions with Batch Image Processing to Resize Images in Photoshop
Now that you've created an action, how do you apply information technology to a folder of images to batch resize them? The action you've just created tin be applied on any image y'all take open by pressing the Play push button on the activeness pane.
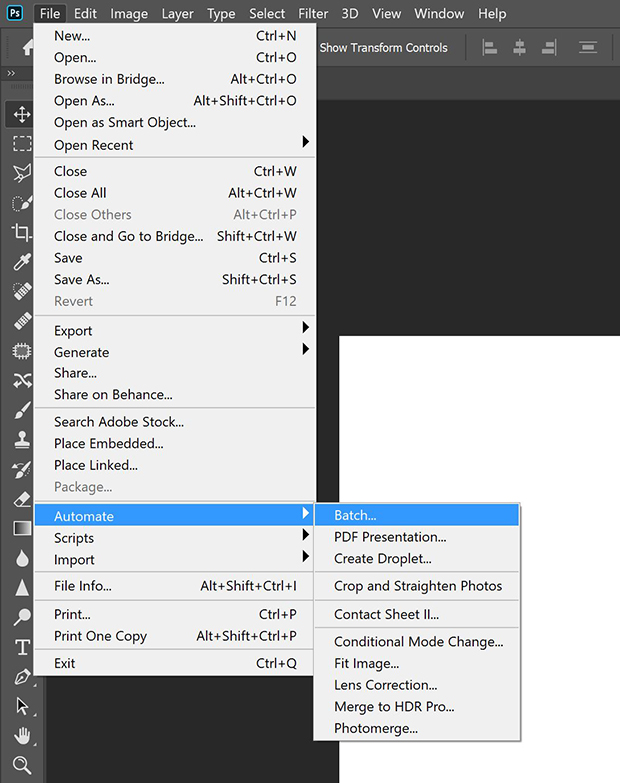
To employ the activity to multiple images in i footstep, start get to File >> Automate >> Batch… in Photoshop's toolbar. This path takes you to the batch automation epitome processing role:
Below you lot'll discover a photograph of the batch automating procedure menu. In that location are several different panels here, each of which controls a dissimilar role of the process. Depending on what you're doing, select options that are relevant to your chore.
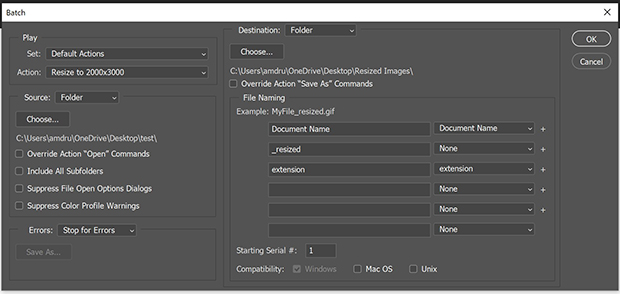
In the Play submenu console, brand sure to select your action. While we saved our resizing activity to default actions, yous may take chosen a unlike binder.
Second, utilise the Source submenu panel to select the folder you're working from. This is the same exam folder that we worked from for the Paradigm Processing test at the start of this guide. Select the options that are important for your process.
We recommend never creating deportment that open the images for you, as many of them tend to suspension or be otherwise unhelpful.
Third, employ the Destination submenu panel to choose where you want the new, resized images to become. You can override Relieve As… commands if you cull, just saving to a new folder is a cleaner mode to go.
Lastly, the file naming choice allows yous to be rather precise with your new files' names. For now, feel free to utilize information technology, just for batch renaming, using something like Notepad++ is both easier, more than versatile, and cleaner.
Press OK, and be greeted with the folder of your resized images:

All these images accept at present been resized exactly to the specifications of the action we created. This process takes less time one time yous set it upward, which means batch resizing images will be a cakewalk in the hereafter.
Additionally, yous can utilise this resize action while working on an agile epitome within the Photoshop workspace, so you lot don't have to wait to batch process until you've finished all your editing. If you liked this guide, be sure to check out our article on how to resize WordPress images automatically.
If yous like this commodity, and then follow us on Facebook and Twitter for more free photography resources. Don't forget to sign upward for our email newsletter so that yous're up to date on all of our costless photography information!
Using WordPress and want to get Envira Gallery costless?
Envira Gallery helps photographers create beautiful photo and video galleries in just a few clicks so that they tin can showcase and sell their piece of work.
Related Posts


How To Reduce Image File Size In Photoshop,
Source: https://enviragallery.com/how-to-batch-resize-images-in-photoshop/
Posted by: prestonhowas1950.blogspot.com
0 Response to "How To Reduce Image File Size In Photoshop"
Post a Comment